Robot Programming
Installing The Software
The First Step in programming is to install and set up what is called an IDE, or Integrated Development Environment which is what this step by step guide will be going over.
Step 1: Download Energia from energia.nu. Once there make sure to select the correct version for your system (for instance the windows one if you have a windows computer).
Now that you have downloaded energia we can move on to installing it.
Step 2: Open up your file browser and navigate to the C drive. This can be done by typing in on the search bar this: C:\
Step 3: When that is open create a new folder named IDE. Then open that folder.
Step 4: Now create another new folder inside of IDE called energia. Then open the energia folder.
Step 5: Lastly open the folder you downloaded from the website and open it. Inside there should be a folder named energia-1.6.10E18. Take that folder and drag it into the energia folder you created in step 4.
Completing those steps properly will have installed energia in the correct place on your computer.
Once you have Energia installed you can move on to step 6.
Step 6: Install the correct driver. Select the correct driver for your operating system on your computer. Linux Users can skip this step.
Once on the correct link. Make sure to scroll down until you see the section labeled with MSP-430g2.
From there follow their instructions to install the driver.
At this point the MSP-430g2 board should be recognized by the IDE and we are ready to begin the next step of actually setting it up to be programmed.


Setting up Energia

Step 1: Start off by opening the Energia IDE you just finished installing. Do this by navigating back to the energia-1.6.10E18 folder from step 5 and double clicking on the energia application inside of it.
Step 2: Once you have opened energia locate the Tools drop down box on the top of the energia window.
Step 3: In tools go down to Board and select the MSP-430g2 w/ MSP-430g2553 option.
If that option is not there it means that the installation is incorrect. Make sure that the drivers were installed and that the energia folder is in the correct place.
Step 4: Next make sure that the MSP430g2 board is plugged into your computer. Once this is done go back to the Tools drop down area.
Step 5: Select port and there should be a single option of what port the board is in. Select that option.
Once all of that has been completed Energia is ready to be programmed for your robot.

Optional Drive Library
This next part is completely optional and is not needed to actually run your robot. The Drive Library adds a single class file to the energia software that will make programming the wheels of your robot much easier and quicker than if not done. If you wish to add the Drive library follow the next couple steps.
Step 1: Download the Drive Library. The button below will start the download for the library, wen that has finished proceed to step 2.
Step 2: Now is time to install the Drive library into energia. Start by opening your energia folder (where the executable for energia is found, it should be called energia-1.6.10E18).
Step 3: Then open the libraries folder found within the one you just opened. (See the above picture for reference).
Step 4: Drag the contents of the Drive.zip folder into the libraries folder.
Step 5: Next open your Energia application and locate the sketch option on the top bar.
Step 6: Next go down and hover over the include library option. A new tab should open and about halfway down you should see the Drive option. Click that. If Drive is not listed make sure you followed the first 4 steps of this tutorial correctly.
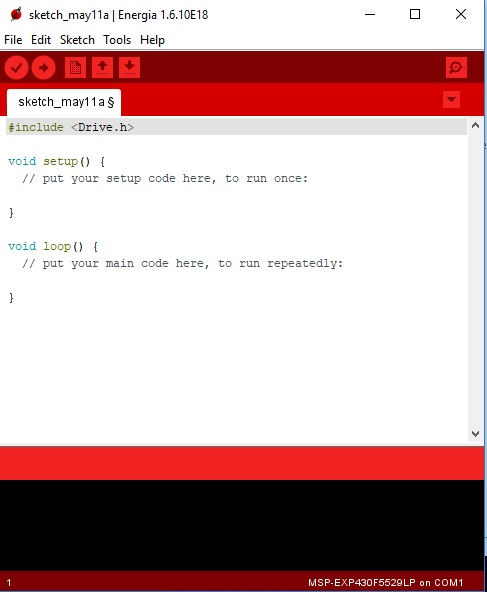
Step 7: After this you should see that the top line of your program now say #include <Drive.h>. This means you are ready to use the Drive library.
For information on how to use the Drive library inside of your program please refer to the Document linked below listing all needed information.